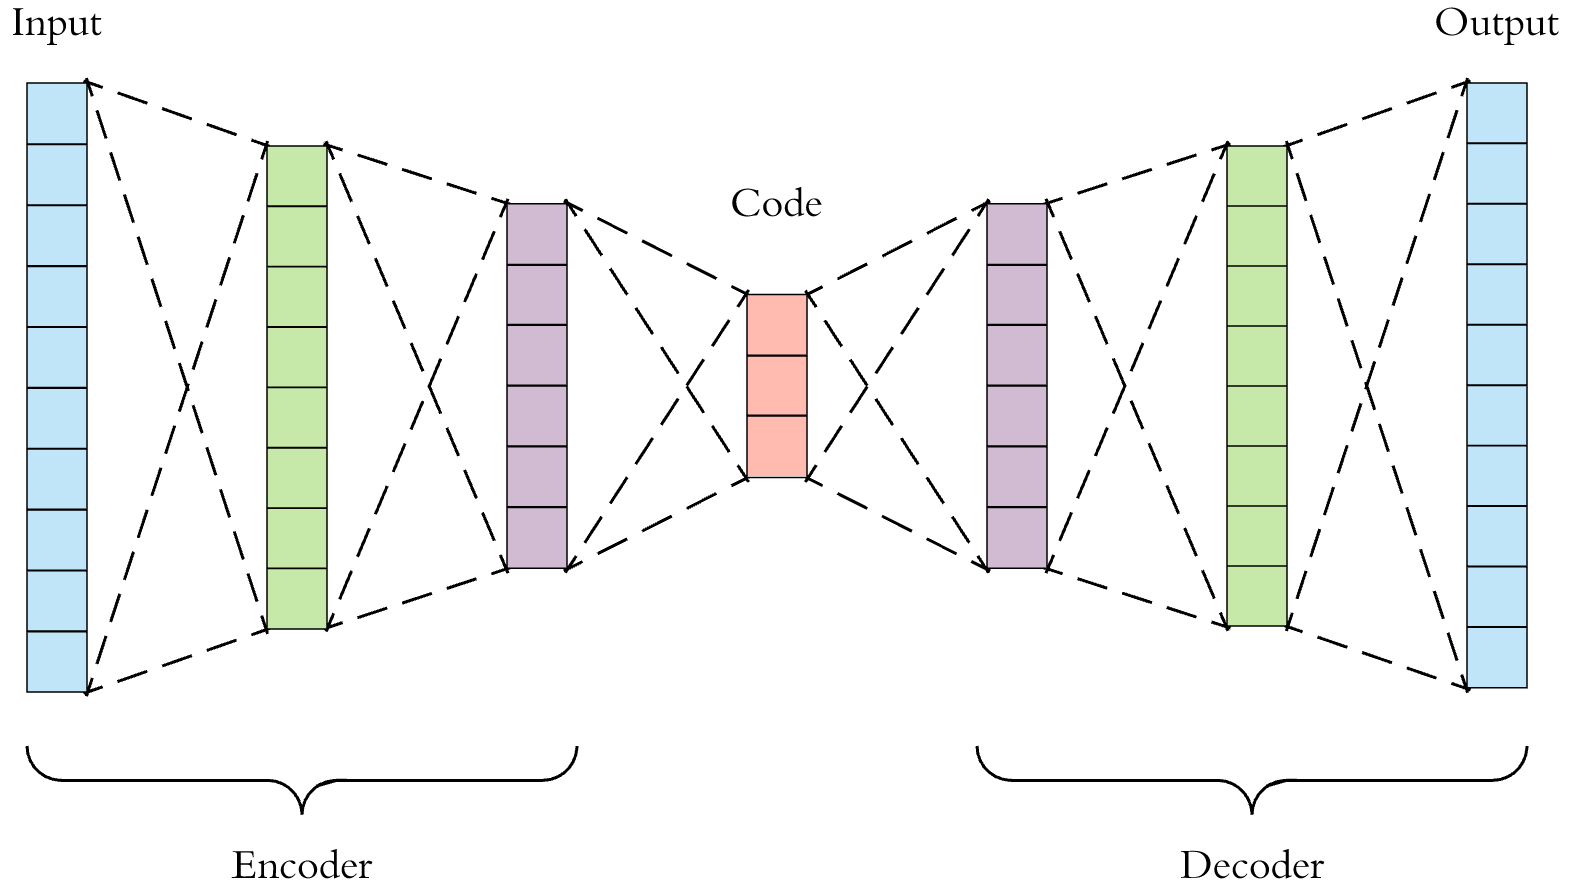
对于普通编码器和自动编码器,编码器中的层如何通过网络连接?一般来说,编码器和自动编码器有什么区别?
编码器和自动编码器有什么区别?
理论
编码器
- 一般来说,编码器是一个映射和输入空间和代码空间
- 在神经网络的情况下,它是一个生成模型,因此是一个能够从某些输入(如 GAN)计算表示的函数
关键是:你将如何训练这样的编码器网络?
- 一般的答案是:这取决于你想要你的代码是什么,最终取决于神经网络要解决什么样的问题,所以让我们选择一个
信号压缩
目标是为您的输入学习压缩表示,允许重建原始输入,最大限度地减少信息丢失
在这种情况下,因此你想要的维度低于维数在 NN 情况下,这意味着代码空间将由比输入空间更少的神经元表示
自动编码器
专注于信号压缩问题,我们想要构建的是一个能够
采用大小
N字节的给定信号将其压缩成另一个大小
M<N字节的信号重建原始信号,从压缩表示开始,尽可能好
为了能够实现这个目标,我们基本上需要 2 个组件
一个编码器,它压缩其输入,执行映射
一个解码器,它解压缩其输入,执行映射
我们可以使用神经网络框架来解决这个问题,定义一个编码器 NN 和一个解码器 NN 并训练它们
重要的是要观察这种问题可以通过无监督学习的便捷学习策略有效地解决:无需花费任何人工(昂贵)来构建监督信号,因为原始输入可以用于此目的
这意味着我们必须构建一个本质上在 2 个空间之间运行的 NN
这输入空间
这潜在或压缩空间
训练背后的总体思路是让某个输入沿着编码器 + 解码器管道传输,然后将重建结果与具有某种损失函数的原始输入进行比较
更正式地定义这个想法
- 最终的自动编码器映射是和
- 这输入
- 这编码输入或输入的潜在表示
- 这重构输入
- 最终你会得到一个类似于

- 您可以使用类似的损失函数以无监督的方式训练此架构以便是与相关的损失与重建相比输入也是理想的结果
代码
现在让我们在 Keras 中添加一个与 MNIST 数据集相关的简单示例
from keras.layers import Input, Dense
from keras.models import Model

# Defines spaces sizes

## MNIST 28x28 Input
space_in_size = 28*28

## Latent Space
space_compressed_size = 32

# Defines the Input Tensor
in_img = Input(shape=(space_in_size,))

encoder = Dense(space_compressed_size, activation='relu')(in_img)

decoder = Dense(space_in_size, activation='sigmoid')(encoder)

autoencoder = Model(in_img, decoder)

autoencoder.compile(optimizer='adam', loss='binary_crossentropy')
为了简洁地回答这个问题,编码器是将一些输入映射到一些不同空间的函数。这方面的一个例子就是大脑所做的事情。我们必须处理环境给我们的感官输入,以便它可以存储。
另一方面,自动编码器的工作是学习表示(编码)。自动编码器将具有与输入相同数量的输出节点,以重建输入而不是尝试预测 Y 目标。自动编码器通常用于减少高维数据集中的输出维度。
希望我回答了你的问题!
作为 NicolaBernini 回答的补充。这是一个完整的清单,它应该适用于包含 Tensorflow 的 Python 3 安装:
"""MNIST autoencoder"""

from tensorflow.python.keras.layers import  Input, Dense, Flatten, Reshape
from tensorflow.python.keras.models import Model
from tensorflow.python.keras.datasets import mnist
import matplotlib.pyplot as plt
from matplotlib.pyplot import figure

"""## Load the MNIST dataset"""

(x_train, y_train), (x_test, y_test) = mnist.load_data()

"""## Define the autoencoder model"""

## MNIST 28x28 Input
image_shape = (28,28)

## Latent Space
space_compressed_size = 25

in_img = Input(shape=image_shape)
img = Flatten()(in_img)
encoder = Dense(space_compressed_size, activation='elu')(img)
decoder = Dense(28*28, activation='elu')(encoder)
reshaped = Reshape(image_shape)(decoder)
autoencoder = Model(in_img, reshaped)
autoencoder.compile(optimizer='adam', loss='mean_squared_error')

"""## Train the autoencoder"""

history = autoencoder.fit(x_train, x_train, epochs=10, shuffle=True, validation_data=(x_test, x_test))

"""## Plot the training curves"""

plt.plot(history.history['loss'])
plt.plot(history.history['val_loss'])
plt.legend(['loss', 'val_loss'])
plt.show()

"""## Generate some output images given some input images. This will allow us to see the quality of the reconstruction for the current value of ```space_compressed_size```"""

rebuilt_images = autoencoder.predict([x_test[0:10]])

"""## Plot the reconstructed images and compare them to the originals"""


figure(num=None, figsize=(8, 32), dpi=80, facecolor='w', edgecolor='k')
plot_ref = 0

for i in range(len(rebuilt_images)):

  plot_ref += 1
  plt.subplot(len(rebuilt_images), 3, plot_ref)

  if i==0:
    plt.title("Reconstruction")

  plt.imshow(rebuilt_images[i].reshape((28,28)), cmap="gray")

  plot_ref += 1
  plt.subplot(len(rebuilt_images), 3, plot_ref)

  if i==0:
    plt.title("Original")

  plt.imshow(x_test[i].reshape((28,28)), cmap="gray")

  plot_ref += 1
  plt.subplot(len(rebuilt_images), 3, plot_ref)

  if i==0:
    plt.title("Error")

  plt.imshow(abs(rebuilt_images[i] - x_test[i]).reshape((28,28)), cmap="gray")

plt.show(block=True)
我已将训练优化器的损失函数更改为“mean_squared_error”以捕获图像的灰度输出。更改 的值
space_compressed_size
以查看它如何影响图像重建的质量。